Learning Programs
Manage Learning Programs
When you finished defining the structure of your program you can go ahead and launch it.
Launch the program
By launching we are referring to the process that will make the program available to learners. This can be done in two ways. You can either specify who should receive the program by directly adding learners to it. Or you can just configure Auto Enrollment and rely on changes to the structure of a learner group.
Add Learners
- From the Learning Program View page, click on the Add Learners button
- Select the learners that you want to add to the program by directly selecting them or by specifying different learner groups.
- If you want the learners to be notified about the program enabled the notification field and configure the message.
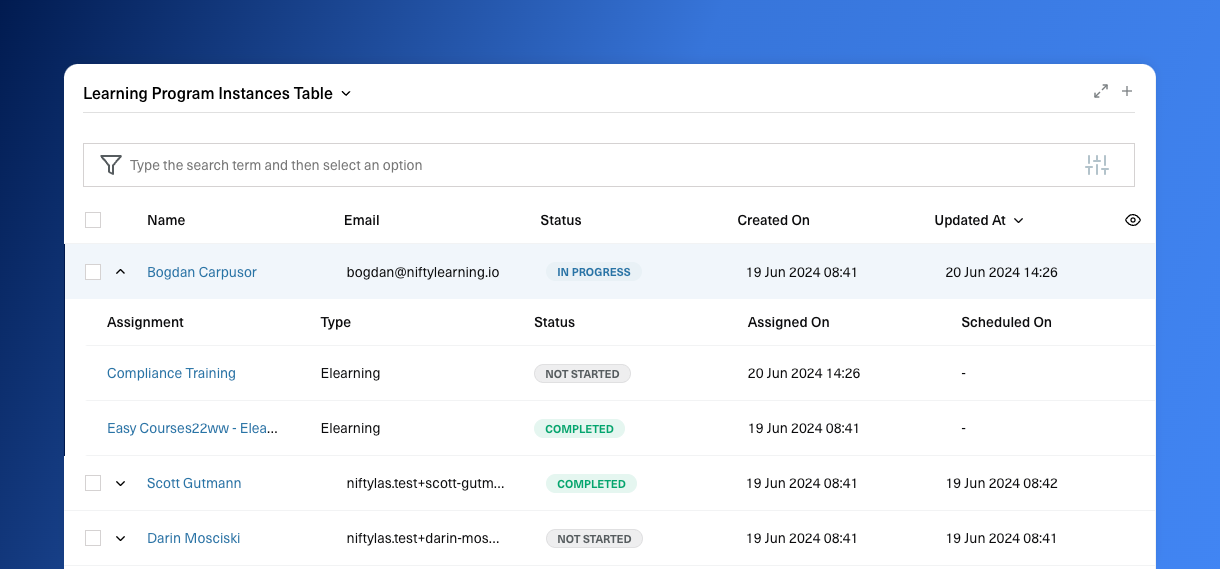
- Submit the form and you will see that the page layout has changed. You can now see a table with all the learners and their statuses. You can use this table to monitor the progress of learners through the program.
If you want to add new learners to the program you will have to click on the Add icon button from the top right corner of the learning program instances table.
Enable Auto Enroll
Auto Enroll is a feature that allows for learners to be automatically added on a program once they join a learner group. This can happend either when a learner is manually added to a static group, or when the attributes of a learner change and they are now part of new dynamic groups.
The auto enrollment flow works in the following way:
- From the Learning Program View page, click on the Enable Auto Enroll button
- Select the learner groups that should be used to automatically add learners to the program.
- If you want the creation process to be delayed fill in the Scheduling field. This is useful in cases where an employee joins the company during a week but you want to delay the learning program (eg: induction) process for the next week in order to work with all the new joiners from that week at the same time.
- Submit the form and you will see that the page layout has changed. To monitor which learners get added automatically to the program go tot the Enrollment tab.
If you want to make changes to the auto enrollment process you can click on the Edit Auto Enroll icon button from the top right corner of the Auto Enroll Config card. To disable/enable the feature you can click on the next button from the same card.
Monitor the activity
The Learning Program Instances table, from the Monitoring tab, will provide you with most of the tools and information you need to have control over the learning process.
- You can expand each row and see the individual status of learning instances.
- New learners can be added when you click on the Plus icon button from the top right corner of the table.
- You can send manual notifications to learners by selecting them and then clicking on the Notify button.
- If learners end up stuck in the program with a Blocked status you can resolve the issue either manually or automatically.
Learning Program Instance Status
A learner that goes through a learning program can have one of the following statuses:
- Not Started - The learner has not started any of the initial learning content items.
- In Progress - The learner has started at least one of the initial learning content items.
- Blocked - The learner has reached a point where it is impossible for them to finish the learning program (eg: the have failed a test and there is no condition that can assign them new learning so that they can end the program).
- Completed - The learner has met all the conditions necessary to reach the Program Completed node.
- Failed - The learner has met the conditions necessary to reach the Program Failed node.
Resolve Blocked Instances
In case a learner ends up in a Blocked status, you have two options at your disposal:
- Automatic resolution
Use Nifty to automatically assign the learning content that is needed for the learner to go further in the program. Select the learning program instance and the click the Unblock button. The app will determine what is needed and assign it to the learner.
- Manual resolution
If your case is too complex or if you want manual control over the process, you can resolve it yourself by selecting the learning program instance and clicking on the Add Assignment Instances button. This way you will determine what piece of content is needed and assign it to the learner.